In this article I will show you what do to in case your AirPods don’t connect to your Windows operating system. In this article you will find a few solutions that worked for a lot of users, so I am hoping that it will also work for you.
When you are trying to connect to your AirPods on your Windows operating system, you pair them but sometimes it will simply not connect, so you won’t be able to use them as an audio device. In the following lines I will show you a few things that you can try and hopefully those steps will help you fix the issue.
Set your AirPods as a Default Speaker
Click on the Search Box and then type there Control Panel to open the old Control Panel from Windows 10. In Control Panel, on View by, select Large icons and then click on Sound. In the Playback tab, click on your AirPods and then click on the Set Default button. This way, your laptop will automatically use your AirPods when connecting them and will not use the Default Speakers from your PC/Laptop.

Edit some Registries
Click on the Search Box and type there Regedit. Click on Regedit and on User Account Control click on Yes.
Here, go to HKEY_LOCAL_MACHINE > SYSTEM > ControlSet001 > Control > Class.
Here locate the files with the name: {e0cbf06c-cd8b-4647-bb8a-263b43f0f974}

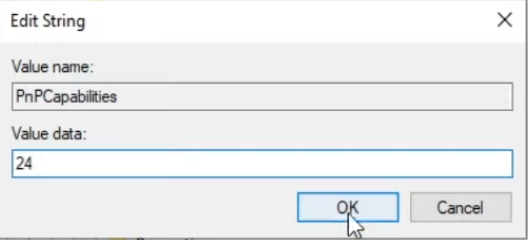
Right click on the file and then click on New and then String Value. Name the new string value PnpCapabilities, double click on it and set its Value Data to 24. After that click on OK.

Exit out of Regedit, restart your computer and you should be good to go.
This is how you can easily fix your AirPods not connecting to your computer via Bluetooth. For a more in depth explanation you can watch the video below from the youtube channel.


